
Speak like a producer
You do not need special syntax. Name the track, action, value, or vibe you want.
Logic stays in focus
Revocalize drives the Logic Pro app on your Mac, so open the project you want to control.
Risky actions pause
Deletes and overwrites ask for confirmation before anything destructive happens.
Installation
Requirements
- macOS 13 Ventura or later (Apple Silicon recommended)
- Logic Pro 10.7+ installed
- A built-in or external microphone (for voice mode — optional)
- Internet connection (for GPT responses; all Logic Pro automation runs locally)
Step 1 · Download & install
- Click the Download Revocalize Co-Producer button on our website. A
.dmgwill save to your~/Downloadsfolder. - Double-click
Revocalize Co-Producer v0.2.28.dmg. A window opens showing the Revocalize Co-Producer icon next to an Applications folder shortcut. - Drag Revocalize onto the Applications shortcut. Wait ~5 seconds for the copy to finish, then close the window and eject the DMG from your desktop.
Step 2 · Launch the app
Open Applications in Finder and double-click Revocalize.
Step 3 · Approve keychain access
On first launch, macOS will show a keychain prompt asking for your Mac account password. You may see it up to three times in a row — that's normal, each prompt is for a different keychain entry.
Step 4 · Grant Accessibility permission
Revocalize uses macOS Accessibility to drive Logic Pro. Without it, no commands will execute.
- On first launch you'll see a banner inside Revocalize: “Accessibility access required”. Click Open System Settings.
- Return to Revocalize Co-Producer — the banner disappears and the app is ready.
Voice permissions (only if you use voice)
Two more permissions are requested on-the-fly the first time you use voice — you don't need to set them up in advance:
| Permission | When you'll be asked | Why |
|---|---|---|
| Microphone | First time you use voice (mic button, push-to-talk, or wake word) | Captures your voice for transcription |
| Speech Recognition | First time you use voice | Transcribes your voice locally on-device |
You can review or change every permission anytime in System Settings → Privacy & Security.
First-time Setup
Open Settings (sidebar → gear icon) and walk through these panes:
Voice
- Wake Word — on-device listening so you can summon Revocalize hands-free while producing.
- Push-to-Talk — hold
Right Option (⌥)to talk; release to send. No wake word needed. - Text-to-Speech — pick Apple's built-in voices (free, offline) or OpenAI voices (requires API key).
About · Danger Zone
If you ever want a fresh start, Settings → About → Danger Zone → Clear All History & Sessions wipes chat history, command history, and confirmation allowlists. Irreversible.
How You Interact
The Studio tab is your main workspace. You have two equal input channels:
- Voice — tap the microphone, use push-to-talk, or say the wake word. You'll see a live transcript as you speak.
- Text — type into the prompt box and hit Return.
Revocalize speaks back using TTS (if enabled) and keeps a conversation history so you can say things like "rename that track to Bass" after creating it.
Studio Bot Pet Assistant
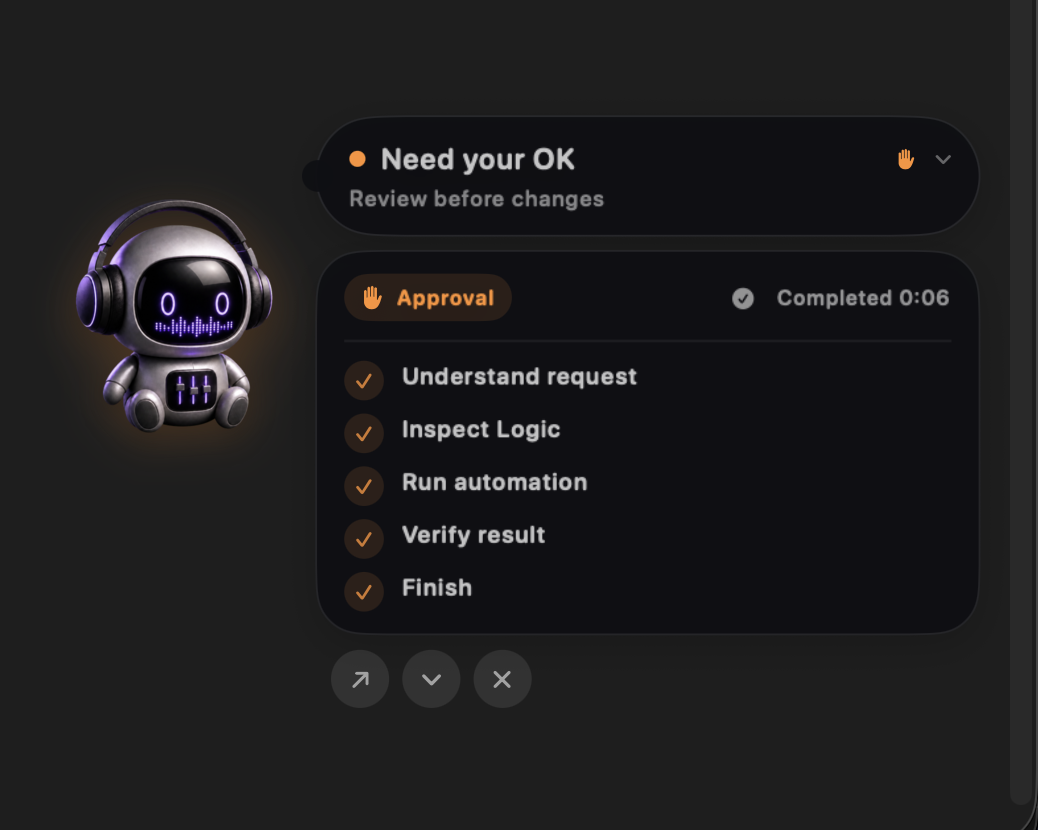
Studio Bot is a lightweight desktop companion for the same Co-Producer session you already use. It stays above Logic Pro and gives you a clear view of what the assistant is doing without covering your arrangement with the full chat window.
What Studio Bot shows
- Live status — see whether Co-Producer is understanding, inspecting, running, verifying, waiting for you, or finished.
- Progress and timeline — click the status bubble to expand the current plan, its completed steps, and elapsed time.
- Safety approvals — choose
Approve & Run, review the full details, or cancel before a high-impact change begins. - In-place controls — stop active work, open the full Assistant, hide the Pet, or collapse the detailed view.
- Recovery actions — retry a failed step or jump directly to the access and Logic recovery action the assistant recommends.
Show and customize it
- Open the Revocalize menu-bar icon and choose
Show Petwhenever you want it visible. - By default, Studio Bot appears automatically when a Logic automation starts. Change this in Settings → Assistant Companion.
- Choose a Small, Medium, or Large companion.
- Set feedback to Minimal, Standard, or Detailed, and optionally enable the completion sound.
Command Library
Revocalize Co-Producer speaks the language of Logic Pro. Every capability below is available today — just tell it what you want.
🗂️ Project Management
- Create new projects — empty or from any built-in Logic template
- Save projects (as, in a specific folder)
- Close projects
- Import audio files into the Project Audio bin
- Inspect project status (tempo, key, time signature, running state)
- “Create a new Hip Hop project at 140 BPM in A Minor”
- “Create an empty project in 6/8 time”
- “Save this as MySong in Documents”
- “Import the audio file /Users/me/Samples/kick.wav”
- “Import kick.wav from my Samples folder”
- “Show me the project status”
- “Close the project”
🎚️ Track Operations
- Create Audio, Software Instrument, or Drummer tracks — single or in batches
- Name tracks on creation ("called Bass") or rename later
- Delete tracks by index or by name
- Inspect all tracks or drill into one
- Set volume in dB
- Set pan, including batch changes across several named tracks
- Mute / Unmute, Solo, and Record-arm tracks
- “Add a Software Instrument track called Lead Synth”
- “Create 4 audio tracks”
- “Add a Drummer track named Kyle”
- “Rename track 0 to Vocals”
- “Delete the track called Guide”
- “Set the Bass track volume to -6 dB”
- “Pan the rhythm guitar 35 left and the lead guitar 35 right”
- “Mute track 2”
- “Unmute the Drums track”
- “Show me all tracks”
- “List the regions on track 0”
🎵 Audio & MIDI Regions
- Add an audio region from a file in the Project Audio bin to any track at a specific bar
- Add an empty MIDI region to a Software Instrument track at a specific bar/length
- “Add the audio file kick.wav to track Drums at bar 1”
- “Place bass_loop.wav on the Bass track starting at bar 5”
- “Add a 4-bar MIDI region on Lead Synth at bar 1”
- “Drop an empty MIDI region on track 2 starting at bar 9 for 8 bars”
- "Import /path/to/loop.wav" → file lands in the Project Audio bin
- "Add loop.wav to the Drums track at bar 1" → region appears on the timeline
⏯️ Playhead & Timeline
- Move the playhead to any bar or measure
- “Go to bar 1”
- “Move the playhead to measure 16”
- “Jump to bar 33”
📄 Templates
- Browse Logic's template library by category (Hip Hop, Electronic, Songwriter, etc.)
- Create a project directly from a template
- “Show me all available templates”
- “List the Hip Hop templates”
- “Create the Trap Heat template”
🎛️ Supported Parameters
| Parameter | Range / Values |
|---|---|
| Tempo | 20 – 990 BPM |
| Time Signature | e.g. 4/4, 3/4, 6/8, 7/8 |
| Key Signature | Note + Major/Minor (e.g. C Major, A Minor, F# Major) |
| Track Types | Software Instrument · Audio · Drummer |
| Track reference | By index (track 0) or name (track "Bass") |
| Bar position | bar 1, measure 16, etc. (1-indexed) |
💬 General Conversation
Revocalize also answers general music-production questions and follows context across a session:
- “What's a good starting tempo for drum & bass?”
- “What tracks did I just create?”
- “Explain what a send is”
Organize a Session for Mixing
Use this when a production session needs to become easier to mix without losing the choices already made by the producer. The assistant looks at track names, types, placement, folders, stacks, routing, and other available signals before deciding where a track belongs.
What the organization pass protects
- Intentional folders and nested stacks that already express the arrangement.
- Summing structure, routing, automation, and the regions already on each track.
- Mixed-role stacks such as a production group containing drums, bass, and instruments. If changing one would be ambiguous, the assistant asks first.
- Single tracks that are already classified correctly. Standing alone is not a reason to move a track into
UNKNOWN.
Recommended workflow
- Open the Logic project you want to prepare.
- Ask “Organize this session for mixing.”
- Review the audit, proposed structure, and any questions about ambiguous groups.
- Approve the plan only when the grouping matches your intent.
- “Audit this session and tell me how you would organize it for mixing”
- “Organize this session for mixing, but preserve my vocal and drum stacks”
- “Clean up the session structure without changing routing, automation, or regions”
- “Show me the tracks you are not confident about before organizing anything”
Apple Loops
Describe the musical role rather than hunting through filters. Co-Producer can combine genre, instrument, tempo, key, and mood in one request, then keep the audition process conversational.
Search, audition, place
- Ask for a sound, including any constraints that matter: instrument, genre, key, tempo, or mood.
- Preview the result and say “next one” for another option.
- When you find the right loop, tell Co-Producer to place it in the project.
- Ask for an alternative when you want an A/B option; the original remains available for comparison.
- “Find me a dark house bass loop in A minor”
- “Show me a brighter percussion loop around 124 BPM”
- “Preview the next one”
- “Use this loop and place it at bar 17”
- “Give me an alternative but keep the first version for A/B”
Plugins & Mixer Control
Co-Producer can inspect the channel strip before changing it, reuse a suitable plugin that is already inserted, and build a processing chain from plugins available on your Mac. Mixer moves use the dedicated Logic control channel and are checked after execution.
Plugin-aware changes
- Inspect existing inserts and avoid adding an unnecessary duplicate.
- Discover compatible Logic or Audio Unit plugins installed on the Mac.
- Build ordered plugin chains and use sends or aux returns when the request calls for them.
- List, load, and save plugin presets, including presets inside folders.
- Target a named plugin when several editor windows are open.
Verified mixer changes
- Set exact volume values in dB across one track or a whole group.
- Pan several named tracks in a single request.
- Mute, unmute, solo, or record-arm tracks without relying on fragile screen positions.
- Verify the resulting mixer state in Logic before reporting completion.
- “Inspect the Lead Vocal plugins and reuse what is already there before adding anything”
- “Build a clean vocal chain using plugins installed on this Mac”
- “Set Bass to -6 dB, pan Guitar L 35 left, and Guitar R 35 right”
- “Create a shared vocal reverb send without duplicating an existing reverb”
- “Open the Channel EQ on Lead Vocal and load my vocal preset”
MIDI Generation
MIDI Generation turns a sentence into playable parts. Ask for “deep-house drums at 124 with a sub bass and a pluck” and the Co-Producer generates the MIDI, creates a Software Instrument track per part with a meaningful name, and imports each part onto its matching track automatically.
Three ways to use it
- Generate. A fresh idea from a prompt — one part (“a funky bassline at 110 in A minor”) or a whole groove (drums + bass + chords + lead), each on its own track.
- Revise. Keep the conversation going — “make the bassline more syncopated and add a punchy kick” builds on the same idea rather than starting over, and re-imports the result.
- Improve. “Improve the pluck — give me 2 variations” analyzes the existing part, generates A/B options on new tracks, and mutes the original so you can compare. The original is never deleted.
How to use it
- Type or speak what you want — include tempo, key, and vibe for best results.
- The first generation takes up to a minute (the Co-Producer tells you up front). Each part comes back as its own
.midfile. - Tracks are created and the parts imported automatically — then keep refining in the same conversation.
- “Generate deep-house drums at 124 with a sub bass and a pluck”
- “Create a funky bassline at 110 BPM in A minor”
- “Make the bassline more syncopated and add a punchy kick”
- “Improve the pluck — give me 2 variations”
- “Give me a darker, more driving version of the whole thing”
Audio Analyzer
Ask “analyze this track” or “is my mix too harsh?” and the Audio Analyzer decodes the waveform and extracts real measurements — peak / RMS / crest, spectral balance across the frequency bands, dynamic range, noise floor — then translates them into plain-language issues and suggested processing.
What it detects
- Problems: clipping, sibilance, harshness, mud, boominess, thinness, an audible noise floor, and over-compressed or over-dynamic material.
- Suggested fixes: mapped to the problem — sibilance → de-esser, mud → a targeted EQ cut, and so on.
- Mix-wide checks: “is my mix too loud / muddy / harsh?” renders a full mixdown and reports on the whole balance.
How to use it
- Select a track or region (or just name it), then ask the Co-Producer to analyze it — it reads your live selection, not a stale snapshot.
- Read the metrics, the detected issues, and the suggested processing — then ask it to act (“add a de-esser”, “cut the mud”).
- “Analyze the selected track”
- “What is this track? How would you fix it?”
- “Is my mix too harsh, muddy, or loud?”
- “Go through the session, find clipping and excessive sibilance, and how you’d fix each”
Revocalize Regions
Ask the Co-Producer to “revocalize the Lead Vox track with Lora” and it re-sings your audio regions with a voice model from your Revocalize account, then places the result on a new (Revocalized) Audio track aligned to the original bar positions. Your source track is left untouched, so you can A/B instantly.
How to use it
- Pick what to re-sing. Name a track for all its regions, name one region for just that one, or leave it open to use your current selection.
- Choose a voice. Use a voice name from your account — “what voices can I use?” lists them. Ambiguous names prompt a clarification rather than a guess.
- Tweak settings (optional). Key, scale, harmony, autotune, and transpose default to the plug-in's values and can be overridden in the prompt.
- “Revocalize the regions on the Lead Vox track with the Lora voice”
- “Re-sing my selected regions with Marcus”
- “Revocalize the "Verse 1" region on track 3 with Lora, key A minor”
- “What voices can I use?”
Plans, Approvals & Recovery
A request that combines several goals can affect many parts of a project. For those jobs, Co-Producer prepares a visible plan before execution so you can understand the sequence and catch a wrong assumption early.
What happens before a complex run
- The assistant interprets the request and inspects Logic.
- It presents the proposed steps and the important decisions it made while planning.
- Choose
Approve & Runto continue, review the request in the full Assistant, or cancel without executing. - Follow progress in the main window, Floating Assistant, or Studio Bot; all three show the same run.
During and after the run
- Cancel cleanly when the result is no longer wanted; the current job is stopped instead of being left silently active.
- Detect stalled work and surface a clear status rather than waiting forever.
- Recover in context with actions such as retrying an available failed step, locating Logic, or reopening Accessibility settings.
- Verify the result after supported Logic operations before the run is marked complete.
- “Prepare this session for mixing and generate a new bassline”
- “Show me the plan before you change this project”
- “Stop the current command”
- “Retry the failed step”
- “Open the full Assistant so I can review the details”
Custom Workflows
Workflows are repeatable Logic Pro automations described in plain English. Build them in Assistant mode, run them from the browser, and switch to Debug mode when one misbehaves.
- You start with $15 free credit per account.
- Running an existing workflow is always free.
- Building a new workflow costs $1–10+ depending on complexity (simple ~$1, multi-step mixing chains up to ~$15).
- Top up at /plans → Co-Producer Credits.
- Credits never expire.
🧩 What is a workflow?
- A reusable automation. Each workflow is a YAML file that captures a sequence of Logic Pro UI steps — selecting tracks, opening menus, setting values. Run it over and over instead of re-prompting the assistant every time.
- Two modes. Assistant mode plans, builds, and tests a brand-new workflow from your description. Debug mode points the agent at an existing workflow file so you can test, fix, or improve it.
- The browser shows only yours. The Browse panel lists only the workflows you've created. Bundled / system workflows are used by the agent under the hood but stay hidden from the UI so they can't be accidentally deleted.
🛠️ Create a workflow
- Switch to Assistant mode. In the Workflows tab, set the mode switcher in the header to Assistant (the purple one).
- Describe what you want. Type a plain-English description of the automation. The more specific the better — include track types, parameter values, ordering.
- Let the agent plan, build, and test. The status ribbon shows progress through
Plan → Build → Debug → Done. The agent saves the workflow as a YAML file when it's confident the steps work. - Find your new workflow in the browser. Click the folder icon in the header to open the Browse panel. New workflows appear under their category. From here you can run them anytime.
- “Build a workflow to mute all audio tracks”
- “Create a mix-prep workflow for mastering”
- “Automate volume fades across all tracks”
- “Build a workflow to split regions at the playhead”
▶️ Run a workflow
- Open the Browse panel. Click the folder icon in the Workflows header. The Workflows section lists your custom workflows by category.
- Tap the workflow you want to run. If the workflow needs arguments (a track name, a tempo, a file path), an inline form appears in the chat. Fill it in and submit.
- Watch progress in the status ribbon. The phase chain at the bottom shows live progress. When it finishes you'll see a result card with elapsed time, step count, tokens used, and a Run Again button.
🐞 Debug a workflow
- Switch to Debug mode. Use the mode switcher in the header. The orb turns amber to signal you're in Debug mode.
- Pick a workflow to test. Open the Browse panel and click a workflow. Its filename appears in the header as a pill — that's the workflow the agent will reason about.
- Ask questions or run live tests. Type things like “Why does this fail at step 3?”, “Test this against live Logic Pro”, or “Improve error handling here”. The agent will trace the workflow and propose fixes.
🚀 Share & earn
When a workflow is reliable in your project, you don't have to keep it to yourself. Push it for review by the Revocalize team — if it's accepted, it lands in the marketplace where other producers can run it and you earn revenue every time it's used.
- Make sure it runs reliably. Run the workflow against a fresh Logic Pro project a couple of times. If it depends on your specific setup (track names, plug-in versions) it won't pass review — workflows should be general.
- Push it for review. Open the Browse panel, hover the workflow, and click the blue Push button (arrow-up icon). The YAML uploads to our review queue. You can keep using the workflow locally while it's being reviewed.
- We review it. Our team checks the workflow for safety, quality and uniqueness. You'll hear back when it ships — usually within a few days.
If accepted, your workflow:
- 🏪 Lands in the marketplace. Other producers can browse and run it from inside Revocalize, with you credited as the author.
- 💰 Earns you revenue. You get paid a share every time another user runs your workflow. The more useful and reusable it is, the more it earns.
- ✨ May join the assistant itself. Standout workflows can be integrated directly into the Revocalize assistant — invoked automatically by the agent whenever a user's request matches what your workflow does. Highest-value placement.
💡 Tips for great workflows
- Be specific in your prompt. Say “at 120 BPM” rather than “with a tempo”. Name the track type (
Software Instrument,Audio,Drummer) instead of just “a track”. Concrete parameters lead to concrete workflows. - Keep workflows focused. One operation per workflow tends to be more reusable than one giant workflow that does everything. Smaller pieces compose better.
- Debug after every build. Right after Assistant mode saves a new workflow, switch to Debug and run it once against your project. Fix any failures while the context is fresh.
- Sessions ≠ workflows. The Sessions tab in the browser holds your past chat history — useful for resuming a previous build/debug conversation. The Workflows tab holds the saved automations themselves.
⚙️ Requirements
- Accessibility permission. Workflows automate Logic Pro through the macOS Accessibility API — the same permission the voice agent uses. Grant it in System Settings → Privacy & Security → Accessibility.
- Logic Pro must be open. Workflows act on the currently focused Logic Pro project. Open the project you want to operate on before running a workflow.
- Credits. Building or debugging a workflow via the chat agent draws from your credit balance — billed at the actual AI provider cost, accumulated across every internal turn the agent runs (a simple workflow might be ~$1–3, complex ones $10+). Running an already-built workflow is always free, whether it's bundled, your own, or from the marketplace. Every account starts with $15. Top up at /plans → Co-Producer Credits; view your balance in Profile → Credits.
💳 Credits & pricing
Building and debugging draw from your credit balance, billed at the actual AI provider cost. Running an already-built workflow is always free.
| Action | Cost |
|---|---|
| Running an existing workflow | Free |
| Building a new workflow (Assistant mode) | ~$1–3 simple · $10+ complex |
| Debugging a workflow | Charged per AI turn |
Buying more credits
- Open /plans.
- In the Co-Producer Credits card, pick a tier —
$10,$50,$100, or Other for a custom amount ($1–$1,000). - Complete checkout via Stripe.
- Credits land in your balance immediately — no expiration.
🚨 Running out of credits
- Running existing workflows still works. Execution is free, always.
- Building or debugging is paused until you top up. The assistant will tell you what to do next.
- Top up in seconds at /plans → Co-Producer Credits.
📊 Usage & policy
- Credits never expire. They sit in your account until you spend them.
- The $15 starter credit is one-time per account.
- Purchased credits are non-refundable.
❓ FAQ
Why does building cost more than running?
Building requires the AI to research, plan, write, and test the workflow against your live Logic Pro session — many LLM calls. Running an existing workflow is deterministic; no AI calls at all.
Can I get extra free credits?
Active beta testers and frequent contributors can email support@revocalize.ai. We'll work something out.
Can I cancel a workflow build mid-way?
Yes. Hit the cancel button in the Workflow Studio while a build is running. You'll only be charged for the AI calls completed before you cancel.
Voice Input Modes
| Mode | How to trigger | Best for |
|---|---|---|
| Wake Word | Say the wake phrase while Revocalize is listening | Hands-free while your fingers are on your keyboard or instrument |
| Push-to-Talk | Hold Right Option (⌥), speak, release | Quick one-off commands, noisy rooms |
| Manual | Click the mic button in Studio | Deliberate sessions |
| Text | Type into the prompt box | Precise paths, complex parameters, silent environments |
All four modes use the same command language — pick whichever feels right in the moment.
Tips for best voice recognition
- Speak clearly at a normal pace; don't rush.
- Reduce background music playback while issuing commands.
- Be specific: "Create a Software Instrument track called Bass" beats "make a track".
- Include all parameters in one sentence when you can: "Create a Hip Hop project at 140 BPM in A Minor".
- Reference tracks by name when possible — more reliable than counting indices.
Privacy & Safety
Logic automation is local, and cloud processing is used only by features that need it. Here is what each part of the app does.
The app controls Logic Pro on your Mac through Accessibility; it does not upload the entire project file to run commands.
Apple Speech Recognition transcribes microphone input on-device when local voice input is enabled.
Prompts and the project context needed to answer them may be sent to the configured AI service. Your whole Logic project is not uploaded as a project file.
Audio is uploaded only when you choose a cloud feature that requires it, such as Revocalize voice conversion. The source remains in your Logic project.
Apple voices run locally. Cloud TTS sends response text to the selected provider to generate speech.
Clear conversation history and confirmation allowlists from Settings → About → Danger Zone.
Troubleshooting
| Problem | Fix |
|---|---|
| Nothing happens when I give a Logic command | Open Settings → Studio, confirm Logic Runner status is Running · green. Re-register if needed. |
| Voice isn't transcribing | Check System Settings → Privacy & Security → Microphone and Speech Recognition — both must allow Revocalize. |
| Push-to-talk doesn't respond | Check Privacy & Security → Accessibility — Revocalize must be enabled. |
| Commands are misheard | Speak clearly, reduce background noise, or switch to text mode for that command. |
| Revocalize refuses to delete something | That's the confirmation gate. Approve once for the session, or tick "Remember" to allow it permanently. |
| Studio Bot does not appear during automation | Open Settings → Assistant Companion and enable automatic display. You can also open the menu-bar icon and choose Show Pet. |
| A command is stalled or partially completed | Expand Studio Bot or open the full Assistant. Use the offered Retry step or recovery action, and confirm Logic and Accessibility are still available. |
| Apple Loops search returns no useful result | Confirm the relevant Apple Loops are installed in Logic, then broaden the request by removing one constraint such as key, mood, or exact tempo. |
| The mix-organization plan misunderstood my folders | Cancel before execution and ask for an audit only. Explain which stacks are intentional, then request a revised plan that preserves them. |
More answers live in-app: Help & Tips → FAQ · Troubleshooting · Best Practices.
Support & Feedback
In-app feedback (fastest)
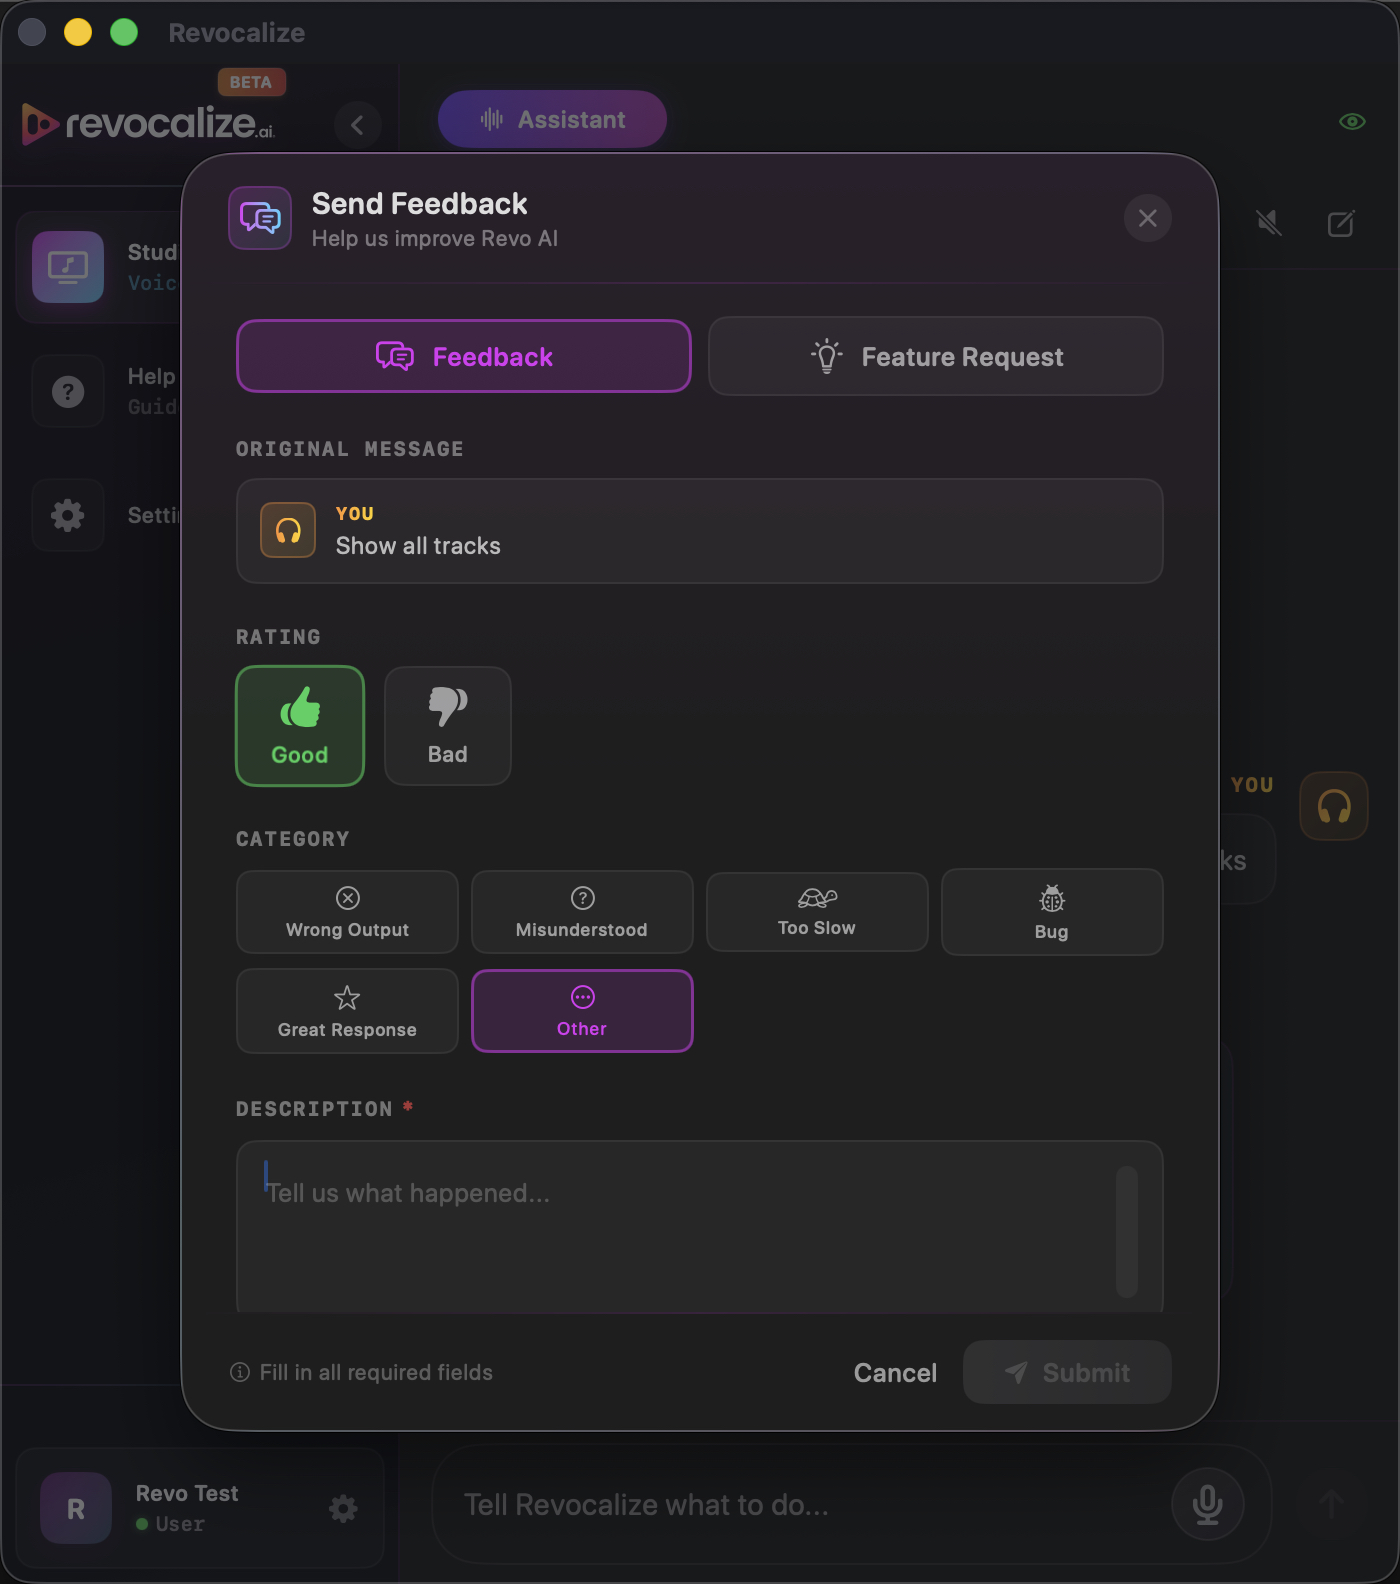
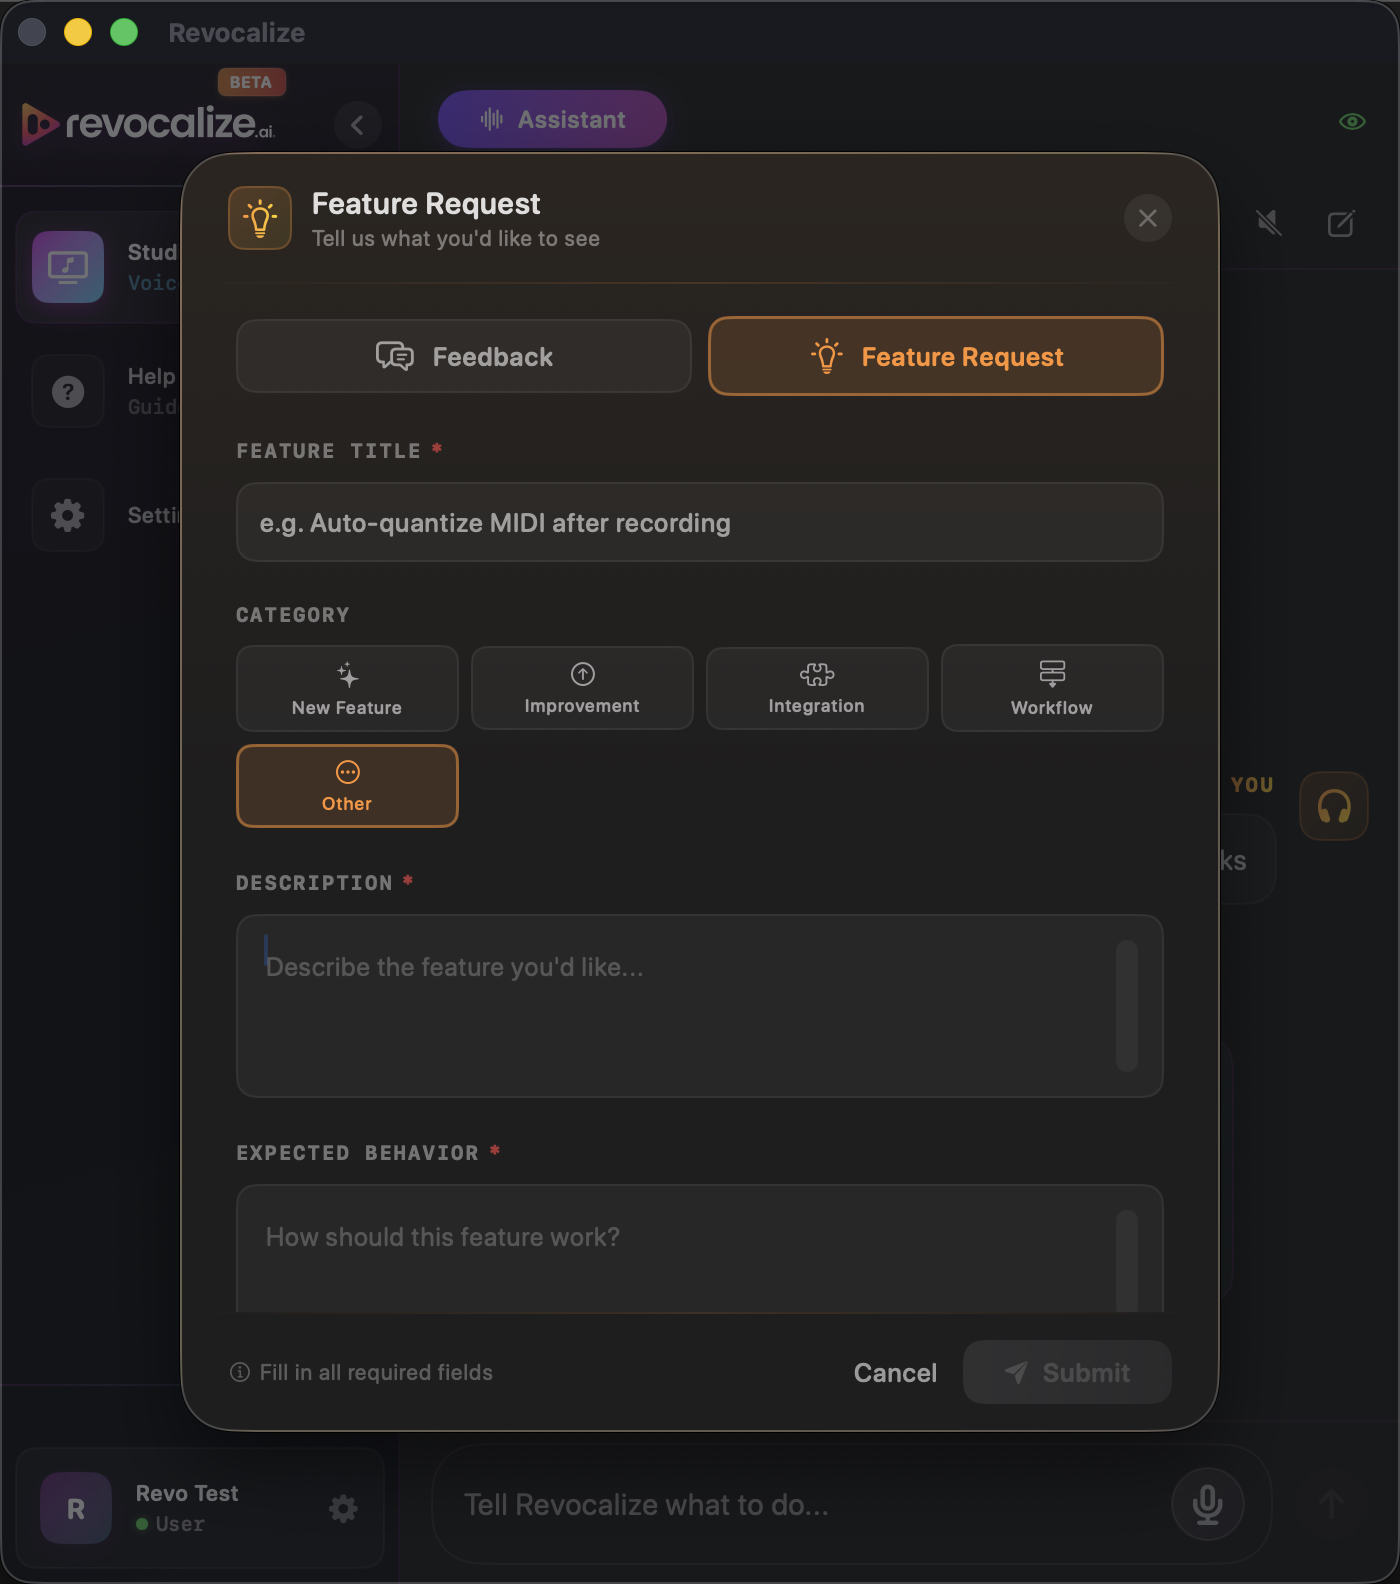
Hover over any message — yours or the assistant's — and two icons appear on the right side of the bubble: Send Feedback (was this command handled well?) and Request Feature (something you wish worked). Each opens a small inline form you can send in a single click. Both go straight to us with the exact command text attached, so we know what you were trying to do.
We read every message — Revocalize is in early beta and your real-world sessions shape the roadmap.
Release Notes
What's new in Revocalize Co-Producer, newest first. Every release during the beta is free to use.
The autonomy build: multilingual Logic control, supervised self-recovery, durable project context, safer long-running generation, and clearer progress from the first action through verified completion.
Logic in Your Language
Co-Producer can now read Logic Pro when its interface is set to German, Spanish, French, or Simplified Chinese. Track headers, mixer controls, menu paths, dialogs, and common automation anchors are resolved in the language Logic is actually running. English behavior is unchanged, and an unsupported language produces useful guidance instead of a silent failure.
Supervised Autonomy
The Autonomy Supervisor evaluates every tool outcome, Revo Doctor finds viable recovery capabilities, and a Shadow Critic challenges repeated or unsafe approaches. Recovery preserves successful work, repairs only unresolved targets, and stops at a real user decision instead of turning an approval request into a failure.
Durable Project Intelligence
Long sessions now retain the active project, stable track targets, completed operations, persisted plans, and background-job handles outside the chat transcript. Co-Producer reuses targets that already exist, skips changes that already match, and starts a clean plan for a fresh request — reducing duplicate tracks, stale instructions, and repeated mixer passes.
- MIDI generation is safer and easier to follow — long jobs continue in the background with visible progress, a supervised timeout, and at most one fresh retry. Generated material is checked against the project's tempo, key, and musical role before import; if that route is unavailable, Co-Producer can suggest a context-appropriate alternative such as Apple Loops.
- Existing projects and windows are handled more carefully — project creation reconciles the currently open project, handles the chooser and close/save dialogs, reports the project that actually opened, and uses a safe versioned name when the requested project name already exists.
- Operations are evidence-driven and idempotent — a shared operation registry, stable target references, structured outcomes, generic verification, traces, and bounded recovery sagas help every command avoid replaying completed mutations. Partial batch work continues only with failed or unattempted targets.
- Session organization scales to larger projects — classification plans are persisted and passed by reference instead of being copied through the model. Organization can move directly from live classification to verified execution while preserving routing and adapting roles to the project.
- Mixer and audio analysis do less repeated work — mixer settings are checked before they are applied, successful moves are never replayed just to obtain an unavailable readback, and a track label can resolve through its real audio regions instead of repeatedly guessing a source filename.
- Revocalize voice selection respects the request — explicitly named voices and preferences such as gender or genre are resolved against the signed-in account instead of silently falling back to a default persona. Ambiguous matches become one clear choice.
- Authentication and permission problems are actionable — rejected sessions prompt a sign-out/sign-in recovery path, Screen Recording setup is guided when visual diagnostics are enabled, and sign-out behavior is reliable again.
- Diagnostics can no longer stop the assistant — runtime traces live in the current user's Application Support folder and remain best-effort. Assistant-window and Workflow-window runs are identified separately, making support logs easier to understand without letting a logging failure terminate the task.
The trust build: every change is read back from Logic before it is reported, known blockers get a specific fix and one retry, and mix analysis measures the actual mix.
Self-Verification
Renames, region mutes, plugin inserts, MIDI FX, and bypasses are now read back from Logic right after they run. If the session doesn't match what was intended, the Co-Producer says so instead of reporting success — so when it tells you the EQ was added, the EQ is there. Learn more
Self-Recovery
A folded track stack, an open automation view, a leftover plugin menu, no project open — each blocker is now recognized individually and gets a prescribed fix and a single retry instead of repeated blind attempts. In testing, importing audio into a folded stack went from 16 steps down to 3. Learn more
Visual Diagnostics
When a step can't be completed or confirmed, the Co-Producer can take one screenshot of the Logic Pro window to see what actually happened. Off by default — you are asked once after launch. Only Logic Pro's window is captured, never the rest of your screen or other apps; the image is used for that one diagnosis, never shown in the app or chat, and deleted immediately. Learn more
- Mix analysis measures the real mix — two bugs are fixed: analysis could fail silently at the export panel, and in some cases it measured a single stem and presented the result as the full mix. It now analyzes the actual bounce, or tells you what it needs from you first.Try: “Is my mix too harsh or too muddy?”
- Organization reads real track names — Perc 2, Congas, Overheads, Room Mic, and Tuner used to end up in UNKNOWN during session organization. They are now sorted where an engineer would put them, whatever suffix you use.
- Audio import works from any state — importing audio files no longer depends on a shortcut that could be unavailable depending on what was focused in Logic.
- Steadier plugin and panel handling — plugin windows close properly, and Apple Loops search, preview, and placement are more reliable.
- Fewer unnecessary confirmations — harmless requests no longer trigger a “are you sure?” prompt just because your wording happened to contain a risky-sounding word.
- Clearer failures — if Logic Pro has no window open (a locked screen, for example), you get a plain explanation instead of an unexplained failed run.
The feedback build: safer mix organization, conversational Apple Loops, plan-first production, a live Pet Assistant, and a much more reliable control layer.
Session-Aware Mix Prep
Co-Producer now audits existing folders, nested stacks, and summing structure before it organizes. It preserves routing and producer intent, uses multiple session signals instead of relying only on track names, and asks before touching mixed-role stacks. Learn more
Conversational Apple Loops
Search your Apple Loops library by sound, tempo, or key; preview options in conversation; and import only after you choose. Ask for an alternative and the original stays available for A/B. Learn more
Studio Bot Pet Assistant
A lightweight companion now floats beside Logic while automation is running. See live progress, expand the step timeline, approve plans, stop work, or retry a failed step without losing focus on the session. Learn more
- Plans before major changes — multi-goal requests become a visible plan before execution so you can review the intended work first.
- More accurate organization — track classification uses multiple available signals, not just names, and correctly classified single tracks are less likely to be moved into unnecessary UNKNOWN groups.
- Plugin-aware processing — the assistant can inspect existing inserts, reuse a suitable plugin instead of duplicating it, and build a chain when the session needs one.
- Verified mixer control — batch volume, pan, and mute changes use the dedicated control channel and are checked in Logic afterwards.
- Safer long-running commands — cancellation is cleaner, stalled runs are detected, and the app can offer future updates automatically.
A reliability-focused drop: hands-free mixing at any scale, producer-language exports, and a steadier ride overall.
Hands-Free Mixing
Balance, pan, or mute any number of tracks in a single request — even a whole session. It runs over a control-surface channel, so it's fast, hits exact dB, and never locks up your keyboard while it works. Every change is verified against Logic afterwards, so “done” means done. Learn more
Export Packages
Just say what you need — “send this to my mixing engineer,” “files for mastering,” or “a client package” — and the Co-Producer plans the right stems, mixdowns, or full delivery, shows you the plan, then exports to the folder you name. Learn more
- Reliable export destinations — exports now navigate to any folder you name (Desktop, a subfolder, anywhere) and create it if it doesn't exist.Try: “Export wet stems to my Desktop.”
- Steadier Logic Pro detection — fixed cases where the app reported Logic Pro as “not installed” even when it was.
- Accurate volume & pan — level and pan moves always land on the track you asked for, at the exact value.
- Bug fixes & stability — many under-the-hood fixes across saving, exporting, and automation for a smoother, more dependable session.
The biggest beta drop yet — Revocalize Co-Producer goes from "moves tracks around" to a true creative partner that generates, listens, and re-sings.
MIDI Generation
Describe a part in plain English and the Co-Producer generates the MIDI, then auto-imports each part onto its own named track. Keep chatting to revise or improve it into A/B variations. Learn more
Audio Analyzer
Decodes the actual audio to flag real issues — clipping, sibilance, mud, boominess — and suggests concrete fixes. Honest by design: no invented metrics for silent or MIDI tracks. Learn more
Revocalize Regions
The Revocalize plug-in's one-click flow, built into the assistant. Re-sing a track with any voice from your account onto a new aligned (Revocalized) track — source untouched for A/B. Learn more
- MIDI analysis & classification — identify a part (bassline / chords / lead / arp / pad / drums), key, polyphony, and the right instrument from a
.midfile or a software-instrument track.Try: “Classify all the MIDI files in my import folder and tell me what instrument each needs.” - Region operations — select and mute regions by name to clean up bleed, count-ins, or breaths without deleting anything.Try: “Mute the count-in region on the BG Vocals track.”
- Plug-in presets — list, load, and save settings on any plug-in (Logic stock, third-party AU, or Revocalize), including nested preset folders.Try: “Open the Channel EQ on track 5 and load a vocal preset.”
- Smart plug-in discovery & chains — map an intent to plug-ins actually installed on your Mac, plan the chain, route sends to aux returns, and verify the result.Try: “Add a vocal chain to the Lead Vox track.”
- Multi-window targeting — with several plug-in editors open, commands act on the plug-in you named.Try: “With the Compressor and Stereo Delay open, load a preset on the Stereo Delay.”
- Instrument loading & transport — load an instrument patch by name and toggle cycle/loop ranges from chat.Try: “Load a Rhodes patch on the Keys track and loop bars 1 to 8.”
- End-to-end song building — generate the core groove, import local parts, organize into colored folder stacks, and mix to a finished record in one conversation.Try: “Create a deep-house track called Demo and mix it.”
First public beta. The foundation: control Logic Pro by voice and text — create projects and tracks, edit the transport, import audio and MIDI, and build reusable Workflows.
- Voice & text control of Logic Pro through the macOS Accessibility API.
- Project, track, and transport operations — create projects, add and organize tracks, play / stop / record.
- Audio & MIDI import from your workspace, plus color-coding and folder organization.
- Custom Workflows — build, debug, and re-run reusable automations described in plain English.
Coming Soon
These are on the immediate roadmap. Today you get the Assistant and Workflows; these land in future releases:
Walkthroughs of common production scenarios.
Automation lanes, region gain & fades, bounce/export, and instrument patch browsing.
Browse and install workflows shared by other producers, with revenue sharing for authors.
Questions? Open Help & Tips inside the app, or email us at support@revocalize.ai. Happy producing. 🎹